
Table of contents:
1. Introduction
MyTracker is a universal tracking tool which allows you to allow all your items central in one customizable repository. This tutorial shows you all the functionality and takes 4 hours. After completing this tutorial you will have customized tracker project with evidence of requirements, new features, Enhancement, bugs, tests, sold releases and support activities. You can of course extend this to better support your needs.
2. Create the database
Start the Admin console and open the database creation form (menu Database\Database list and press the Create button). This will bring up the Database properties screen:

In the Database address field you should specify your connection details for the database server. This is in the format of server[/port] : database. Server is the name of the server machine, it's IP address or localhost if you connect locally. The [/port] part is optional. The default port is 3050 so if you use an another port, you can specify it. Database is the path to the Firebird database (.fdb) file that will store the actual data. The initial login user/password are sysdba/masterkey.
In the Choose script screen select the minimal.ddl script. This will create the minimum required database structure for myTracker to work.

Press Ok and myTracker will create the minimal database!
3. Issue fields - Entities
In this chapter we define the entities and the generate the needed issue fields.
RequirementMyTracker stores all data in one database table. Therefore we must define all needed fields in one data record and add a field to distinguish the stored entities (Issue type).
| Recapitulation of all needed fields | ||
| Field name | Database field name | Type |
| ID | ID | Integer |
| Submited at | FROMTIME | User1, User2 |
| Submiter | SUBMITER | User |
| Kind | RKIND | Software, Hardware, Documentation, Other |
| Module | MODULE | Module1, Module2 |
| Description | NAME | String |
| Customer | CUSTOMER | Customer1, Customer2 |
| Priority | PRIORITY | Low, Middle, High, Very High |
| Implement in version | IMPLVER | Version 1, Version 2 |
| Estimated effort | EFFORTE | Double |
| Status (of Requirement) | RSTATUS | Submitted, Analyzing, Passed, Deferred |
| Implemented in version | DONEVER | Version 1, Version 2 |
| Actual effort | EFFORTA | Double |
| Status (of New feature) | FSTATUS | Submitted, Analyzing, Programming, Solved, Testing, Closed, Reopened |
| Responsible | RESPONSIBLE | User1, User2 |
| Kind (of feature) | FKIND | Documentation, Functionality, Performance, Translation, Visual |
| Found in version | FOUNDVER | Version 1, Version 2 |
| Status (of bug) | BSTATUS | Submitted, Analyzing, Programming, Solved, Testing, Closed, Reopened, Not a bug |
| Severity | SEVERITY | Show Stopper, Highly visible problem, Commonly encountered problem, Infrequently encountered problem, Extreme corner cased problem |
| Version | VERSION | Version 1, Version 2 |
| Status (of test) | TSTATUS | Submitted, Planning, Testing, Closed |
| Result | RESULT | Passed, Minor problems, Major problems, Show stopper |
| Started at | STARTED | Date with time |
| Duration | DURATION | Double |
| Has module1 | MODULE1 | Boolean |
| Has module2 | MODULE2 | Boolean |
| Price | PRICE | Double |
| Paid | PAID | Boolean |
| Phase | PHASE | Pre-Sale, Analysis, Offer, Development, Deployment, Testing, Production, Not bought |
| Kind (of support) | SKIND | Bug, Configuration, Explanation, Request, Setup, User error |
| Explanation | EXPL | String |
| Issue type | ISSUETYPE | Requirement, New feature, Enhancement, Bug, Test, Sold release, Support |
Lets add the issue fields. It is very simple right mouse click on Issue fields node in the database tree and press new.

Select the type to choice list, set the name. An we have an issue field!

Almost! we have an empty list now, so we must add some field to choose from. So we click on choice field button. And get the properties dialog.

In order to have these values defined we must 4 time click on add an type the name in.

So easy you can add now all the required issue fields. I have add them all in 45 minutes! But you don't have to. If you want you can. Open the SQL Client dialog, paste into text area this file content (CTRL-A, CTRL-C, CTRL-V). And press button (F9). So we can modify the myTracker database directly. Now we must reload our data in the application. So we have to right click in the database tree and update server tree or disconnect and connect again.
If you finish you should see this list of issue fields.
3. Users and user groups
MyTracker uses a simple but powerful user managment. The idea is there are many user groups. User group is a collection of specific user rights. Each user must belong at least to one group. The user get all the user rights from all user group in which it belongs to (additive operation). So you don't need to specify the user rights to each user, but you compose them from the user groups.
For sake of simplicity we make two user groups: AdminGroup and UserGroup. The admin gets all the rights the user can only manage issues. So again right click with mouse on usergroups and press new. Type AdminGroup as name and select the Permissions as shown on picture. Don't select the Login restricted permission!!!


The UserGroup has fewer permission as shown on picture.

We create two users. User1 and Admin. User1 belongs to the UserGroup Admin to the UserGroup. Set password to init (or whatever you want). And select the corresponding user groups.

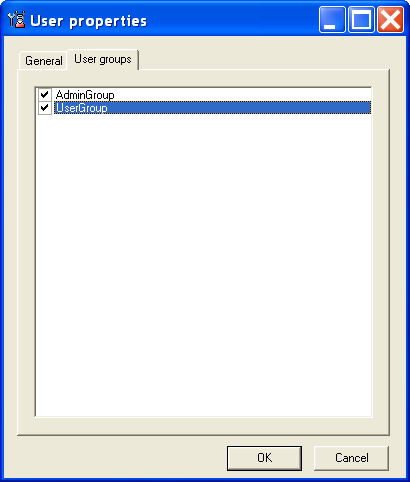
And the second user User2 should belong only to the groups UserGroup.
See also:5. Notes
Note types are used to classify any notes that a user makes with regard to an issue. Notes allows myTracker to track multiple activities on an issue. Add note types by selecting New from the pop-up menu when you right click on the Notes node in the Server explorer. Add these note types: Bug reproduction, Details and Solution. Notes in opposite to string fields allows formatting, links and longer content. So right mouse click, press new and type the names in.

6. Forms
Forms are essential GUI elements in which the user define and change the issue data. The construction of forms is very easy. First add a new form (right mouse click on forms node and new). It opens the form details dialog. Type the name Requirement in field name in. Per drag and drop from the list on right side place the required issue field on the form area. Your form could like mine. As you see the controls on the form are live they are fully functional and have the right values.

As we made this form so make we also forms for New features, Enhancements, Bugs, Tests, Sold releases and Support. if you want to make them from script take this file.
See also:7. Queries
Queries are filters on issues. They help us to reduce the amount of data. We make now a query for all requirements. So right mouse click on queries node and new. Type Requirements in the Name field. Select default form to Requirements. Select the Public query checkbox. And now we come to filter. We select only requirements it means select all the issues with ISSUETYPE=Requirements. So we select in the first combobox the ISSUETYPE in the second the "=" and in the third the Requirements click on the Execute query button. It fires the query (we must do it always, mytracker stores only checked queries!!!). Now we see the select statement in the middle field. The 71 is the Requirement's ID. This query in this form would show the user all the issue fields. We want display only the issue fields related to requirement therefore we click on visible fields button and select only the fields related to requirement. Finally we close the dialog with ok and the we have our first query.


As we made this query so make we also queries for New features, Enhancements, Bugs, Tests, Sold releases and Support. if you want to make them from script take this file.
See also:8. What is an event?
What is it. Don't you have see it in any tracking tool? It is one of many advanced feature of myTracker. It allows the you to fine control the workflow and manipulate data on several points in myTracker. What? What should it means. Why I it?
As you have noticed we manage in one repository a lot of objects kinds (requirements, bugs, ...). Therefore we added a help issue field ISSUETYPE to distinguish them. Easy! We made already dialogs for entering the them. As you see on the Requirements dialog, there is no input field for selecting the type. But the query compares it to 71. So myTracker should somehow know what issue we want to add. The event is the answer. MyTracker fires an OnFormShow event before opening the dialog. In this event we must tell myTracker if we open a Requirement dialog we want add an requirement! Sounds logical. So myTracker please set the ISSUETYPE to 71 (Requirement) if we open the Requirement dialog. Without this event would be the field without values!
Lets make it! Double click on Events node. It opens the events dialog. Select the OnFormShow in the combobox. Type the following code into event handler edit field (bottom). And press Save button.
begin
  if NEWISSUE then
    case FORMID of
      1: ISSUETYPE := 71;
      2: ISSUETYPE := 72;
      3: ISSUETYPE := 73;
      4: ISSUETYPE := 74;
      5: ISSUETYPE := 75;
      6: ISSUETYPE := 76;
      7: ISSUETYPE := 77;
    end
  else
    case ISSUETYPE of
      71: FORMID := 1;
      72: FORMID := 2;
      73: FORMID := 3;
      74: FORMID := 4;
      75: FORMID := 5;
      76: FORMID := 6;
      77: FORMID := 7;
    end;
end.
Some explanation. Events code is written in Pascal language.
Begin and end mean beginning and end of code block. if NEWISSUE
then is a condition which means make the part after then when
NEWISSUE is true. NEWISSUE is true when we make a add new issue and
false when we edit an issue. The case command assigns the appropriate
issuetype for each known Form's ID. So the Requirements dialog (ID=1)
constructs and issue with issuetype 71 Requirement and so on. The case
statement after else make the opposite it select the form depending on
ISSUTYPE.
9. Client console in action
In the previous steps we made all the necessary steps! Now we can finally first time start the client console and play (work).Before you can use the client console to connect to a database you must set up the server connection setting in the server.ini file in the client console directory we can make it manualy or through Database\Register database. This is detailed described in the FAQ.
We start the myTracker client console. First we get a login dialog. We choose the User1 and type the init password. After login we should see the client's (ours normal user) workplace.

Now we add (press Ctrl-A, or click on the first icon or through menu) two Requirements. As I did.

After clicking on ok you would see only ID and the Description, but not the remaining fields. So click on last icon (with two checkboxes) which opens the columns properties. And set the description column with to 275.

Now should you see this.

Yes! You have now a simple tool for evidence of requirements, new features, Enhancement, bugs, tests, sold releases and support activities! You can add, modify and delete the various issue types. By clicking on the column titles you can sort the requirements. For multicolumn sorting press the ctrl. Cool, don't. And we are only at the beginning!!!
10. Stylesheets
You could be wondering for what it the area bellow of the issues table. It servers for previewing the selected issues. You see that we cannot see all the columns (fields) of the issue, therefore we build a small preview. The stylesheets are technically HTML files with some myTracker specific tags which allow us to insert myTracker data. As above we right click with mouse on Stylesheets and new. We set the name to Requirements. And paste this text to lower area and click on update.
<html>
<body bgcolor="#DFFFD0">
  <b>Nr:</b> <Field Name="ID"/>
  <b>Submiter:</b> <Field Name="SUBMITER"/>
  <b>Submited at:</b> <Field Name="FROMTIME"/>
  <b>Status:</b> <Field Name="RSTATUS"/><br>
  <b>Kind:</b> <Field Name="RKIND"/>
  <b>Customer:</b> <Field Name="CUSTOMER"/>
  <b>Priority:</b> <Field Name="PRIORITY"/><br>
  <b>Implement in version:</b> <Field Name="IMPLVER"/>
  <b>Effort:</b> <Field Name="EFFORTE"/><hr>
  <b>Description:</b><br> <Field Name="NAME"/>
</body>
</html>

begin
  case ISSUETYPE of
    71: STYLESHEETID := 1;
    72: STYLESHEETID := 2;
    73: STYLESHEETID := 3;
    74: STYLESHEETID := 4;
    75: STYLESHEETID := 5;
    76: STYLESHEETID := 6;
    77: STYLESHEETID := 7;
  end;
end.
The other stylesheets are defined in this file.
Now when we again (re)connect to the database in the client console. We will see our preview defined by stylesheet.
See also:11. Issue reference
Now we first make support for new features. Then we make an relationship (issue reference) between requirements and new feature and Enhancement. It is a M : N relation. E.g. on requirement can cause X new features and y Enhancements. But some of new features and Enhancements can be more complex and solve some issues for other Requirements. E.g. functionality and Performance.
So as usual right click on Issue references and fill the dialog as shown.

We did it almost. We must add a new OnShowIssueReference event. This small code says for Issue reference 1. Show the slave items in Requirements and show the master items in New features and Enhancements.

Now jump into client console. We got a new tab with our title specified as slave. Slave means we can add here some items.

The new feature is is shown. Cool is that this new feature use an other stylesheet than the (master issue) Requirement. And even Enhancement use it owns stylesheet!

If we select now this new feature we will see which requirement is it related.

It is almost done. We also the possibility to add a relation between requirement and Enhancement but how. As you see the new adds a new feature. While we have specified the default dialog to new feature. So this way it won't work. We must first add a new Enhancement and then Assign it to the requirement.
In this chapter I want you show the power of simplicity of issue reference. The second example goes a little further. Imagine that you have typed all your new features and enhancement catalogue. Now you as a leader decide in which order your team should implement these items. So we need the ability to define items to be done before a specific item and some they should be implemented after. Could you imagine that your features are no list anymore but they are graphs. I will be nice to see the chains of new feature.
Back to reality. We don't dream we make it real! Add a new issue reference as I did.

As you see the key is to select the hierarchical kind. We have the issue reference. But we want to use it only it new features and Enhancements. So we extend our OnShowIssueReference event to:
begin
  if REFERENCEID = 1 then
  begin
    SHOWSLAVE := ISSUETYPE = 71;
    SHOWMASTER := (ISSUETYPE = 72) or (ISSUETYPE = 73);
  end;
  if REFERENCEID = 2 then
  begin
    SHOWSLAVE := (ISSUETYPE = 72) or (ISSUETYPE = 73);
    SHOWMASTER := (ISSUETYPE = 72) or (ISSUETYPE = 73);
  end;
end.

On this picture you see I selected the issue with ID=3 and add twice (New) a new reference issue. Now I have three issues in this order 3, 5 and 6. So if you select the second issue with ID=5. It have one preceding and one following issue. And the third issue have only 2 preceding. Now we add an 4th new feature (ID=7). And add a following issue. We assign it with issue ID=5. Ok. Now 5 and 7 follows 5 and 6 follows 5.

Q:How to add a following issue if I have already one?
A:Use new root or assign root.
12. Reports
Sometime we need not only a selection (filtered data), but we need aggregated data. For this reason has myTracker Reports which consist of one data selection and a report template. The template is a html file as stylesheet and allow us to present the data.
So as usual right click on Reports and press new. Enter the following
query in the Select with wild cards text box:
SELECT ISSUETYPE, SUM(EFFORTE), SUM(EFFORTA), SUM(EFFORTE)-SUM(EFFORTA)
FROM ISSUE GROUP BY ISSUETYPE HAVING ISSUETYPE IN (72,73,74)
In the bottom field paste text from this file
and finally click on execute. Your should see as mine.

And the product as this.
| Report | |||
| Issue type | Estimated effort | Actual effort | Difference |
| New feature | 15 | 6 | 9 |
| Enhancement | 10 | 2 | 8 |
| Bug | 8 | 2 | 6 |
| Sum: | 33 | 10 | 23 |
| Average: | 11 | 3,33 | 7,67 |
Now can any user in client console click on this report an get a quick overview.
See also:13. Graphs
As I wrote in 12th chapter sometimes we need aggregated data.
The second possibility in myTracker is to use graph (charts).
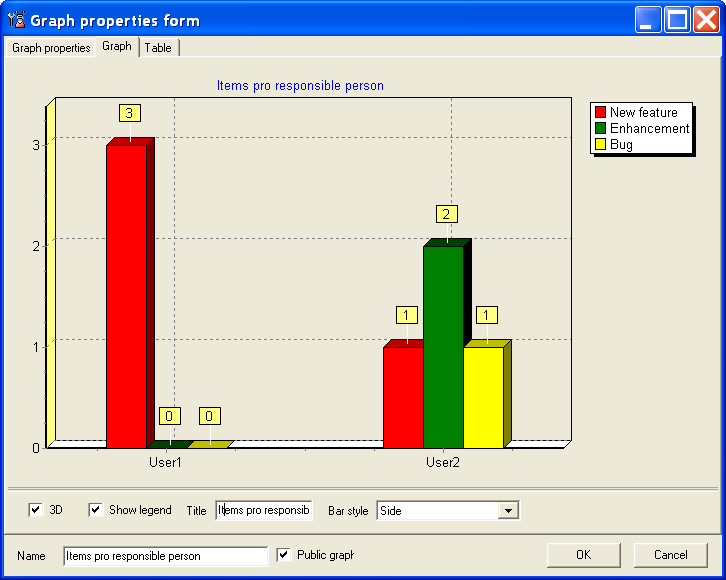
We make a very simple graph showing submitted items pro user.
As usual right mouse on graphs and we jump into the graph details
dialog. First put into the select input field this text:
select count(*), responsible, issuetype from issue
group by responsible, issuetype having not responsible is null
It summarize the number of issue basing on responsible user
and issutype. But only field the issues where exist a responsible
person logically. Press execute to get data. Than set the other settings
as on picture a finally press Graph button.

And the data
14. Useful query parameters and macros
Now we have already a functional system. A typical user would like to search for
items for which its responsible, but it would expect a comfortable to-do list.
So we construct a query which list all the not closed new features, enhancements and
bugs. So we add a new query with this select: select * from issue
where responsible=Current user and issuetype in (72, 73 , 74) . And set the
other settings as shown.

If we click on execute query button myTracker replaces the "Current user" with 1 what is the current user combobox selected user's ID. Changing the selected user in the combobox we simulate the functionality with different logged user. Don't forget to check No append. It prohibits the addition of new issues. It is very important while we didn't define a default Form. We couldn't define it while this query deliver issues of different type.
The next example query show the usage of parameters. We construct a Last 10
query which deliver the last 10 issues of selected type. The user in client console
will select the actual type before the execution of query. It allow us to build
one query and use it for 7 types. Staring with a new query we set this select:
select first 10 * from issue where issuetype = @issuetype order by id desc
And set the other settings as shown.


Now we click on Execute query button and myTracker ask from us what would we like to select.

If you execute the query you get a warning. It's normal myTracker detected only the first 10 before * and it is not common but valid. This warning comes only in myTracker admin console and not in the client console.
See also:15. One-click
When you look in the Admin client we used almost all features. Except images and one clicks. Images are for One-clicks. But what are one-clicks for. The idea is user make regularly repetitive task as programmer receive a bug he analyze and fix it the QA test it and close the bug. With one-click we allow the user make some operation on selected issue without opening it. For example we make and close bug one-click which set the bug status to closed.
We start as usual with right click on Images node. And add a new image. We add
this  image.


It was only preparation. Now we add a new One-Click. Now we define it. First we select the image
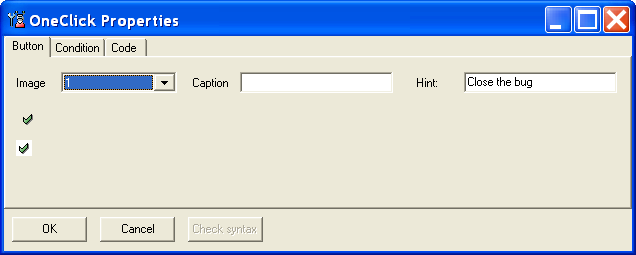
Add a activate condition. If the value of Allowed true is the oneclick will be activated. If you want to always activate a one-click you can also let it empty. We write one-click is allows for such bugs which status is not equal to closed.
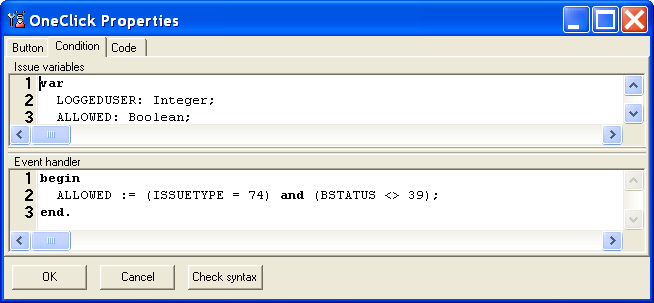
The code says what manipulation on data should be done. We write let close the bug BSTATUS = closed (39).
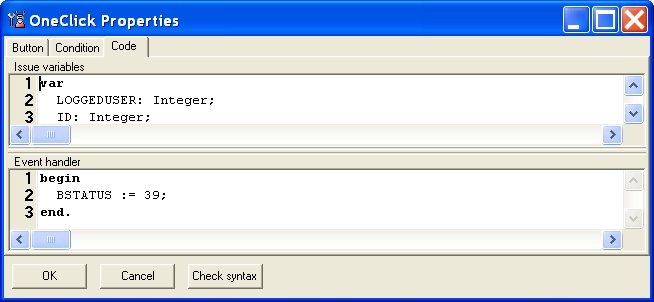
So in myTracker client console it looks like this. A submitted bug can be closed.
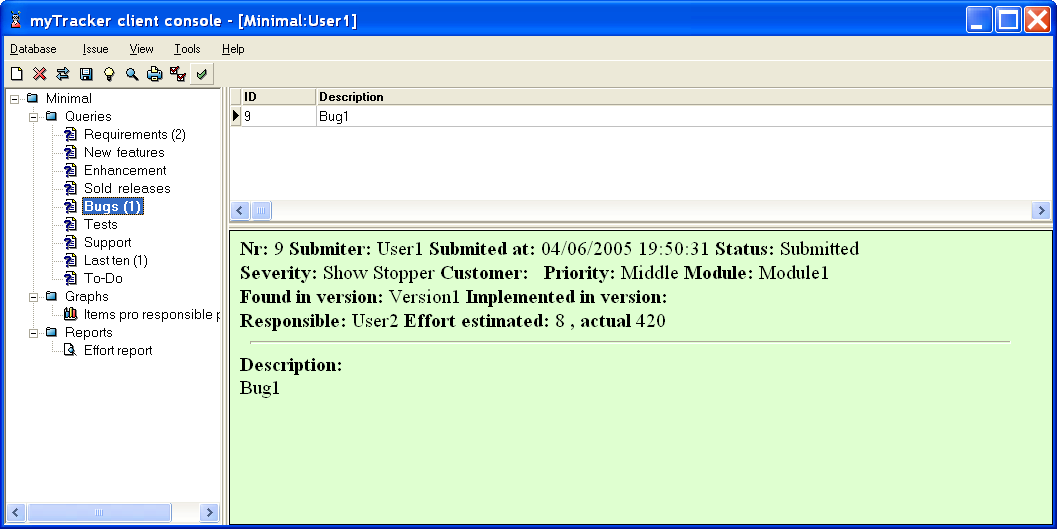
We hit the button and will be immediately closed.

So easy is it to define and use. So use it unique powerful feature.
See also:16.Notes and attachments
In the 5th chapter we defined some notes type, but we haven't use them. So we start the client console. We open the first requirement. We select in the dialog the second page "Notes". Right click and we add a note as me. For href's click on HREF Button and type in the file name. For issue ID click on ID button.

Click on ok.

Now add an attachment on third page.

So as we any user can now open the dialog and see the attachments and notes. If you close the dialog. You preview is formatted with our stylesheet.
But we don't see any trace of notes or even attachments. It would be good to see in the preview that this issue some attachments and notes. For this we need to modify the Requirements stylesheet to:
<html> <body bgcolor="#DFFFD0">
<b>Nr:</b> <Field Name="ID"/>
<b>Submiter:</b> <Field Name="SUBMITER"/>
<b>Submited at:</b> <Field Name="FROMTIME"/>
<b>Status:</b> <Field Name="RSTATUS"/><br>
<b>Kind:</b> <Field Name="RKIND"/>
<b>Customer:</b> <Field Name="CUSTOMER"/>
<b>Priority:</b> <Field Name="PRIORITY"/><br>
<b>Implement in version:</b> <Field Name="IMPLVER"/>
<b>Effort:</b> <Field Name="EFFORTE"/><hr>
<b>Description:</b><br><Field Name="NAME"/>

<Condition NoNotes="1">
<hr>
<table border=1>
<tr>
<td><b>Note type</b></td>
<td><b>Submiter</b></td>
<td><b>Submited at</b></td>
</tr>
<NotesTable2>
</table>
</Condition>

<Condition NoAttachments="1">
<hr>
<table border=1>
<tr>
<td><b>File</b></td>
<td><b>Size</b></td>
<td><b>Submited at</b></td>
<td><b>Submiter</b></td>
</tr>
<AttachListTable>
</table>
</Condition>

</body>
</html>
The bold part is new. It says if this issue have some notes/attachments then make a list of them. If you restart the client console the preview should see this.

You can click on every blue items which opens the associated files or issue.
As you see there are two possibility to reference files to issue. First the attachments which stores the file in the database. The second alternative is to use notes-href. Href is only a link to file, therefore you must always link only files which are accessible to all users.
Now we should update all stylesheet, we add the bold part to all of them.
Keep in mind that you have the possibility to set the attachment and note to private in order to keep it unchangeable(undeletable) to other user!
See also:17.Get notified about changes
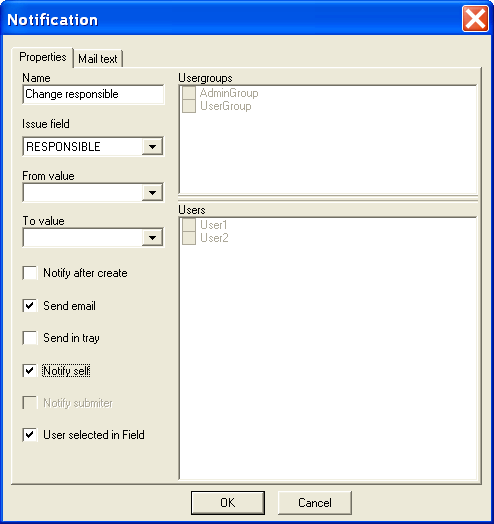
If you are not the only user it is necessary to get notified about the changes directly from system. MyTracker is not exception it supports notifications. Notification has two parts. The first is the triggered event which fires the notification. The second part is the template for the mail body.
First configure the mail as described in the installation. As next each user must have a valid email address! Now we add a common notification which notifies the the user who we select in responsible field. So myTracker automatically sends an email.
And here we specify what body should the email have.
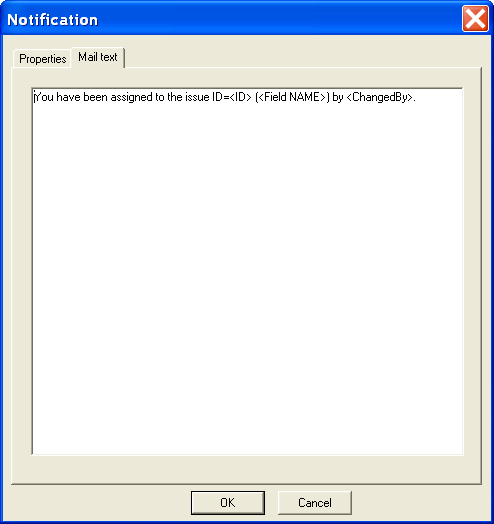
That is! This new notification is ready to work.
See also:18.The rest basic functionality
Database properties
The database properties have 3 important items: 1.Name - it will be display in the database tree as root node, 2.Autologin - if you enable this functionality the user don't have to type the password by client console start, 3.String field max. length - string fields are default 150 character length. If you need longer fields you can set here the needed length. So we change the name to All features.

Sample data generator
If you design your database you need to test your queries. If you need random test data select View\Generate sample data. It generates data in all issue field. If you want to delete the issues then run this command in SQL client: delete from issue. It deletes all your issues inclusive attachments and notes.
Restrict access
It is possible to temporary restrict access to any user group or user. You can specify a message which will be shown at login.
Save query results
MyTracker allows you to save the results into XML, HTML and Excel. You can also print the results through your default browser.
Filtering
Use the column title button or the customize button below the grid
Searching
Click on a column and start typing your desired word. Use Ctrl-Down/Ctrl-Up for searching forward/backward.
Sorting
Click on the column which you want to sort. If you want to add an another column use Shift mouse click.
Grouping
Simple drag and drop a column on the panel above the grid.
Quick show/hide of column
Click on the first title button (before ID) and (un)check the columns.
GUI settings
Under Database\Settings in menu you find on the last page. The first minimize myTracker into tray the second is important it manage the parameterized query execution. Unchecked you must before every execution specify the parameter values. When you check it you must specify the parameters only once. You have later the possibility through reset query parameters select specify new parameter values.
Add choice list parameters
Sometimes the list of choice list grow very fast and some user groups can have the permission to add in the list new items.

19.What next?
As you see the there are a lot possibilities in myTracker to customize the system for your needs. If you need work with the system abroad your local network look at SOAP Service. It allows you to access myTracker world-wide.
Do you miss some feature, so don't hesitate to send me an email. Do you find the product good so you can join to make it much better.